There’s a huge range of clothing available, featuring all sorts of interesting slogans and graphic designs. But what if you want a T-shirt with a specific image or design? If you have a particular design or slogan in mind, why not create your own?
It might sound like a time-consuming project, but it’s actually much easier than you might think. In this article, we’ll show you a simple way to create a T-shirt with your own personalised print.
Creating T-shirts with your own print at home
There are several ways to create a T-shirt with your own design. The easiest option is to have it professionally printed. Usually, all you need to do is submit your chosen design or text and request a quote. However, you’ll have to wait for your finished T-shirt to arrive.
You can also create a personalised T-shirt at home! Making your own clothing print is a fun project and a great idea for a unique gift. So, how do you do it?
You’ll need an
inkjet printer,
ink cartridges for your printer, a plain T-shirt, suitable
transfer paper, and an iron to transfer the design onto the fabric and fix it in place.
Of course, you don’t have to limit yourself to T-shirts. You can use this method to personalise all sorts of clothing and accessories, including jumpers, jackets, cotton pillowcases, and handbags. The process is much the same, but here we’ll use a T-shirt as an example.
What printer is suitable for printing iron-on transfers?
Before you get started, check which type of printer you have. Transfer paper is designed specifically for use with inkjet printers. If you don’t already have an inkjet printer and want to achieve high-quality results when printing your designs, the Canon PIXMA range is a great option. These printers offer excellent print quality and resolution, helping to reproduce fine details and vibrant colours accurately.
Another benefit of choosing a
Canon inkjet printer is access to the free Creative Park app, which features hundreds of ready-made designs and decorations for all sorts of creative projects, not just clothing. You can also use your printer to produce high-quality photos, all you need is some suitable
photo paper.
Some useful products
How to make a T-shirt with your own print: step by step
If you decide to create your own printed T-shirt at home, there are a few things to keep in mind to ensure you achieve a high-quality, long-lasting result. First, you’ll need a design to transfer onto the fabric. If you don’t already have a file with your chosen design, you can easily create one using a range of free online tools.
You’ll also need to consider the colour of the T-shirt you’ll be printing on. Whether it’s white, dark, or another colour will determine which type of transfer paper you should use, as different versions are available for different fabric colours.
Print the design
You’ve got your T-shirt, chosen the right transfer paper, and your design is ready to print. So, what’s next?
We recommend following these steps:
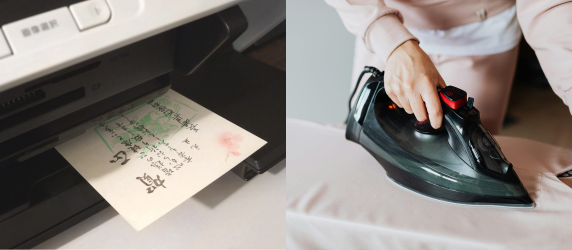
- First, print your chosen design on a regular sheet of copier paper. This allows you to check the size and placement of the design on the T-shirt before printing it onto the transfer paper.
- If everything looks right, it’s time to print your design onto the transfer paper. Set your printer to its highest print quality and print on the smooth side of the paper only. The reverse side is usually marked with a grid or pattern.
- There’s no need to mirror the design – simply print it as you normally would. Once printed, carefully trim away any excess transfer paper around the design or text.
Your design is now ready to be ironed onto the T-shirt.
Iron the design onto the T-shirt
Now it’s time to transfer your design onto the fabric. Place the T-shirt on a hard, flat surface, such as a table. For the best results, we recommend washing the T-shirt before applying the transfer, rather than using it on brand-new fabric.
Remove the backing from the transfer paper and place the design face up on the T-shirt. Set your iron to the highest suitable temperature and cover the design with baking paper or a thin cotton cloth to protect it from direct heat.
To ensure the design adheres properly to the fabric, iron each section for around 30–50 seconds. If needed, you can safely repeat the process a few times.
That’s it! Carefully remove the transfer paper and enjoy your new personalised T-shirt.
Keep your print in perfect condition
It’s important to take care of your new T-shirt to ensure it lasts. Thankfully, it’s very easy! Just wash your T-shirt inside out, on a low temperature. Try to avoid harsh chemicals, like
bleach, and when ironing, avoid touching the print directly. You should iron on the reverse side, or through a piece of cotton instead. This will ensure your print remains in perfect condition for a long time!
Is custom printing a good idea?
Custom made T-shirts are a brilliant gift idea or a fun way to stand out from the crowd. With a little creativity and a few basic supplies, you can create something truly unique yourself.
Another great advantage of this homemade method is that it’s affordable. Transfer paper is inexpensive, and each sheet allows you to create a T-shirt with a completely original design. There’s no need for specialist equipment such as an industrial printer or heat press.
Common Questions
Do I need a special printer to print my own T-shirts?
No! Inkjet printers are perfect for printing high-quality designs on transfer paper. You can browse through our range of inkjet printers at 123ink.ie.
How long does it take to make a T-shirt?
A simple T-shirt can take just a few minutes to make. Designing, cutting, and preparing the design can add additional time. Buy transfer paper and other supplies for T-shirt printing at 123ink.ie.
How long do printed T-shirts last?
A properly applied design can last through
many washes. Following the transfer manufacturer's washing and care instructions is important for maximising durability. Purchase
laundry detergent for your new T-shirt on 123ink.ie.
If you have any questions about our products, don’t hesitate to contact us!